
I did this in PSP 7 and Animation Shop 3. I would think you could also do this in PSP 8.
Materials: Scriptcattail_blank.gif
Open the scriptcattail blank.psp in PSP
You will notice that there are three layers in this image.
Make your foreground and background colors Black (#000000)
Select your text tool (the one with the big A on it)
Click anywhere near where you want to place the text
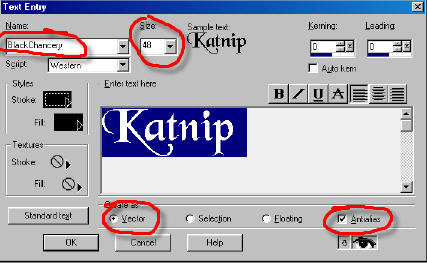
Type your name or text in the window and select the font
(I used Black Chancery for mine)
Make sure that you create this text with the following values:
Size 48
Vector checked
and Antialias Checked
Then click OK
Move your cursor over the center little square box
and left click and hold the button down. Drag the text
over to approximately the position under the cat.
Use the corner square boxes to resize the text by left clicking and holding the button down. Move the mouse diagonally toward the center to make it smaller or drag it away from the center to make it larger.
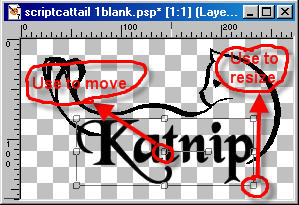
You may have to re-position the text with the middle box and
resize the text several times to get it looking right.
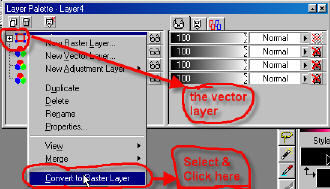
Once you have the text looking the way you want go to the
Layer Palette and right click on the Vector Layer (should be the top layer)
Select from the drop down menu: Convert to Raster Layer
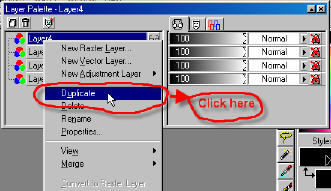
Right click again on this new raster layer and select:
Duplicate
Duplicate it once more so that you have 6 layers like this:
(from top to bottom)
Copy of Layer4
Copy of Layer4
Layer4
Layer3
Layer2
Layer1
Now click on the little eyeglasses in the Layer Palette
to hide all the layers except these two:
Copy of Layer4
Layer1
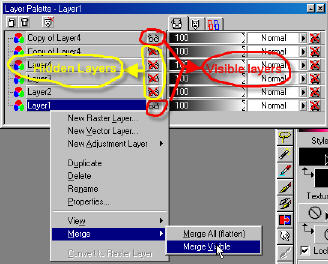
Right click on the Layer1 or the
Visible Copy of Layer4 (the one without the eyeglasses
crossed out with a red X) and select:
merge-Merge Visible
Rename this merged layer to Layer1
Hide this layer
Click on Layer2 and make it visible (click on the red X)
Click on the remaining Copy of Layer4 and make it visible
Merge these two layers as you did the first one
Rename this merged layer to Layer2
Hide this layer
Unhide the remaining Layer3 and Layer4
and merge these two layers the same way
Rename this layer to Layer3
Now you can unhide all the layers
You should now have three layers like this:
Layer3
Layer2
Layer1
Make sure all the layers are visible and
go to FILE-SAVE AS
and save this as a PSP image with a different name
other than the blank image.
Remember what ya name it! and WHERE!!
(I'm famous for losing images on the puter LOL)
Close PSP and go to part two: Animation Shop

